WHMCS Smarters XUI.ONE Owner Billing Module V1.0.4
Configure the Smarters Billing Solution for XUI.one with WHMCS. Learn features, benefits, security notes, and step‑by‑step installation to automate IPTV users, orders, renewals, and invoices.
💡 What Is Smarters Billing Solution – XUI.one?
Smarters Billing Solution – XUI.one is a WHMCS integration that automates the full lifecycle of IPTV subscriptions on XUI.one — from order to provisioning, renewals, suspension, and termination. It combines WHMCS (billing & client portal) with XUI.one server modules (service control via API), so owners and resellers can manage users, services, and invoices automatically or manually from a single dashboard.
Popular across the IPTV industry, this module is widely adopted for hands‑off provisioning, consistent invoicing, and a better client experience.
📋 Key Features (Automation)
- ✅ Create Service: on purchase, WHMCS auto-creates the XUI.one line/subscription. Admin can also create it manually.
- ✅ Suspend / Unsuspend: overdue invoices trigger suspension; successful payment re-enables the service. Admin can force either action.
- ✅ Terminate: unused or cancelled services can be terminated automatically or on admin request.
- ✅ Auto-Renewal: invoices are generated before due date; once paid, the expiry is extended on XUI.one.
- ✅ Easy Setup: upload the module, activate, map products, enter API credentials, and you’re live.
- ✅ Multiple XUI.one Servers: add several instances and assign products to any of them.
🔗 How It Works with WHMCS (Flow)
- Customer orders a product in WHMCS and pays the invoice.
- The module calls the XUI.one API → creates the line, assigns package/bouquet, sets expiry.
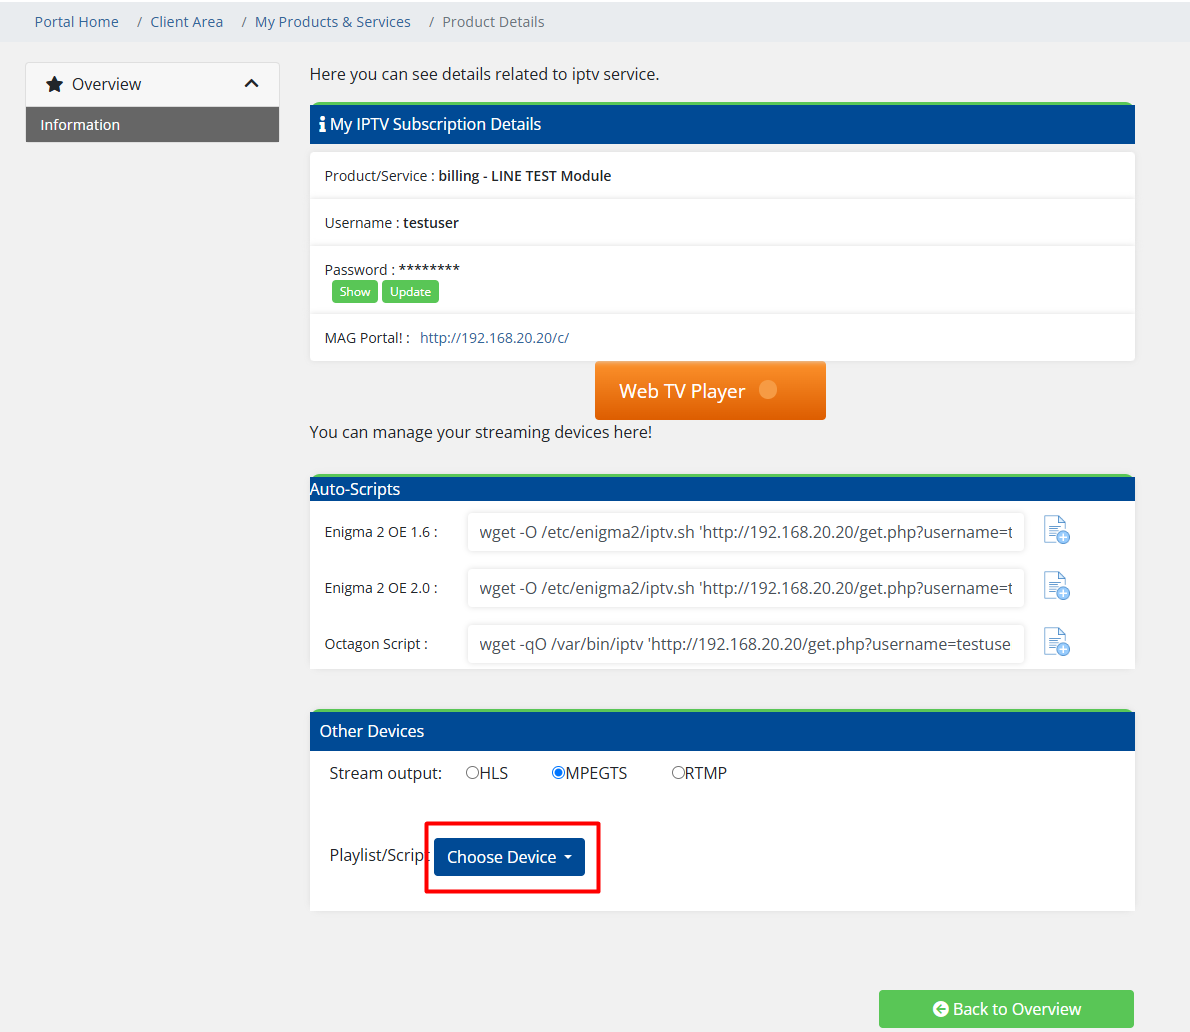
- WHMCS sends credentials (welcome email) to the customer.
- Cron automation manages renewals, reminders, suspensions, and terminations.
- Admin & resellers manage everything from WHMCS.
🛠️ Prerequisites
- Working XUI.one server (owner )
- WHMCS installed on a domain with SSL (HTTPS)
- PHP and MySQL/MariaDB compatible with WHMCS
- Smarters XUI.one module package
- Recommended guide: WHMCS IPTV Integration — Lifetime-Ready
🛠️ Full Installation (WHMCS Smarters XUI.ONE Owner Billing Module)
1) Download & Upload the Module
- Download archive:
👤 You are currently browsing as a guest or free member.
✨ Upgrade to Premium to unlock full access instantly!
- Upload it to your WHMCS root directory (e.g., public_html/whmcs/)
- Unzip → files are automatically placed into:
- /modules/addons/xtreamuionedashboard
- /modules/servers/XUIONE
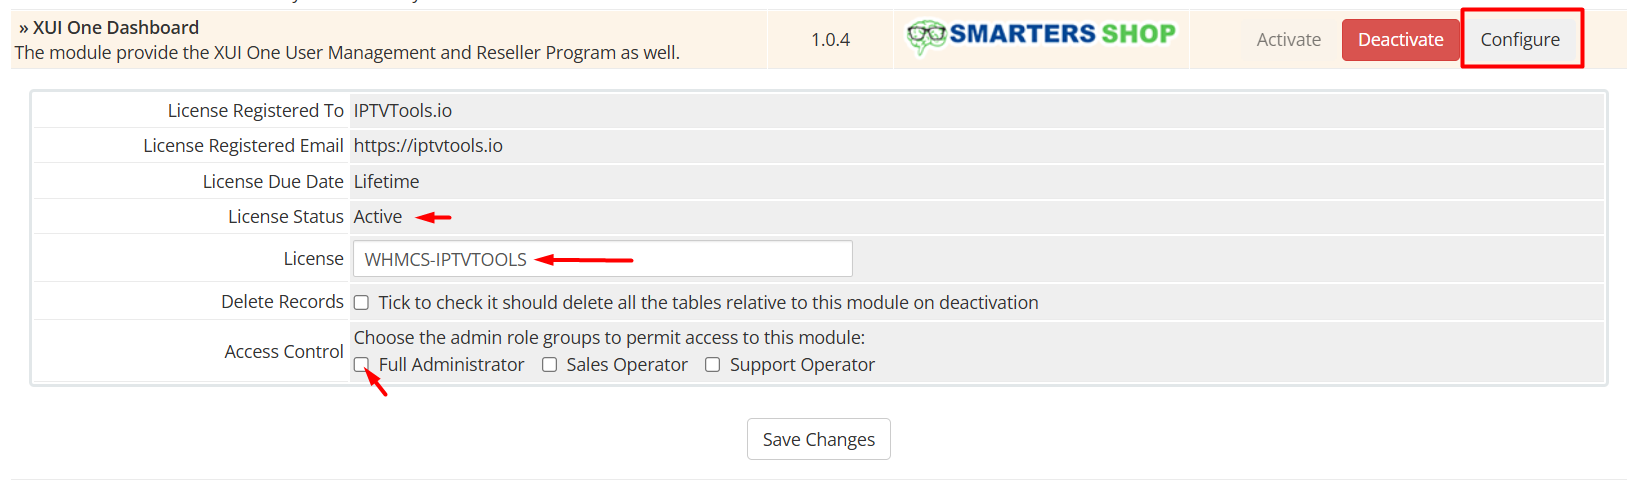
2) Activate & Configure the Addon in WHMCS
- WHMCS Admin → Setup → Addon Modules
- Find XUI One Dashboard → Activate

- Configure → enter any value for License Key → Access Control → Full Administrator → Save
3) Prepare the XUI.one Server — MariaDB User with Local + Remote Access
Assume your WHMCS hosting IP is 192.168.10.10 (replace with your real IP).
SSH to the XUI.one server as root, then open MariaDB:
mysql -u root -p
Enter Password: press Enter
Run the following SQL (use a strong password instead of 1234567890):
What each command does:
CREATE USER …@'localhost'→ creates the user for local connections from the XUI.one hostGRANT ALL PRIVILEGES ON *.*→ grants full access to all databases (simplest start)CREATE USER …@'192.168.10.10'→ allows the same user to connect remotely from your WHMCS IPFLUSH PRIVILEGES;→ applies permission changes immediately
Security tip: replace 192.168.10.10 with your real WHMCS IP and use a long, unique password.
4) Hardening & Best Practices
- After testing, restrict privileges to the specific XUI schema (e.g.,
GRANT SELECT,INSERT,UPDATE,DELETE ON xui_db.* …) - Limit port 3306 to your WHMCS IP in the firewall/provider panel
- Enable 2FA in both WHMCS and XUI.one for admin/API accounts
- Enforce HTTPS everywhere and rotate credentials periodically
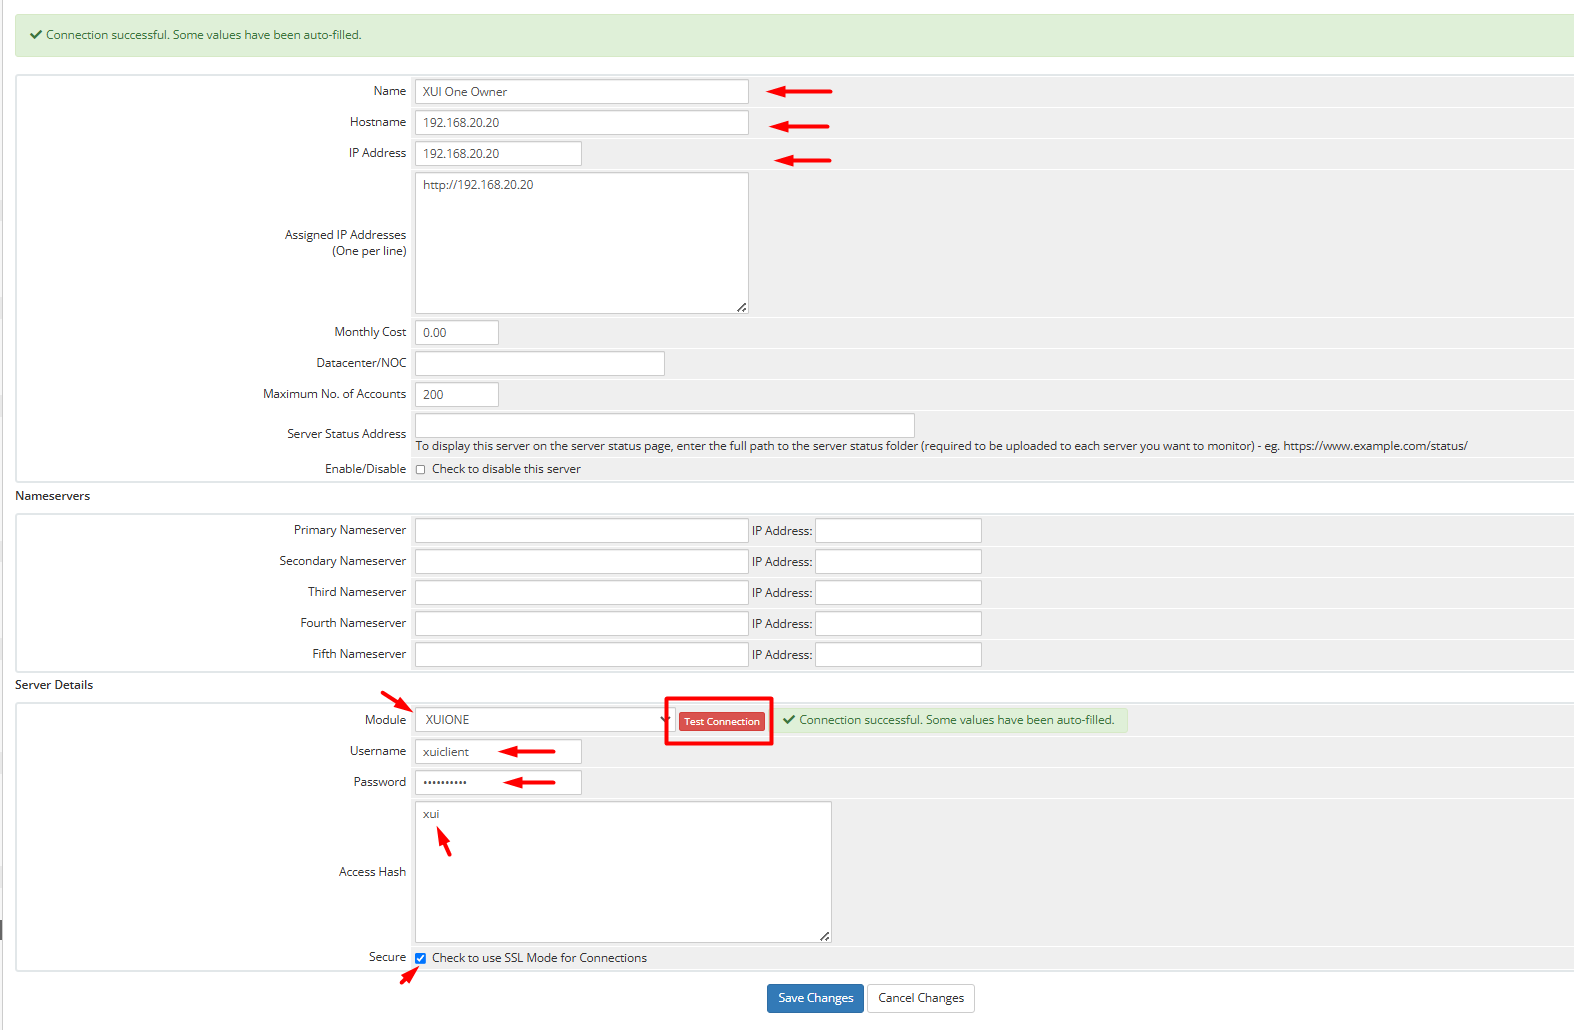
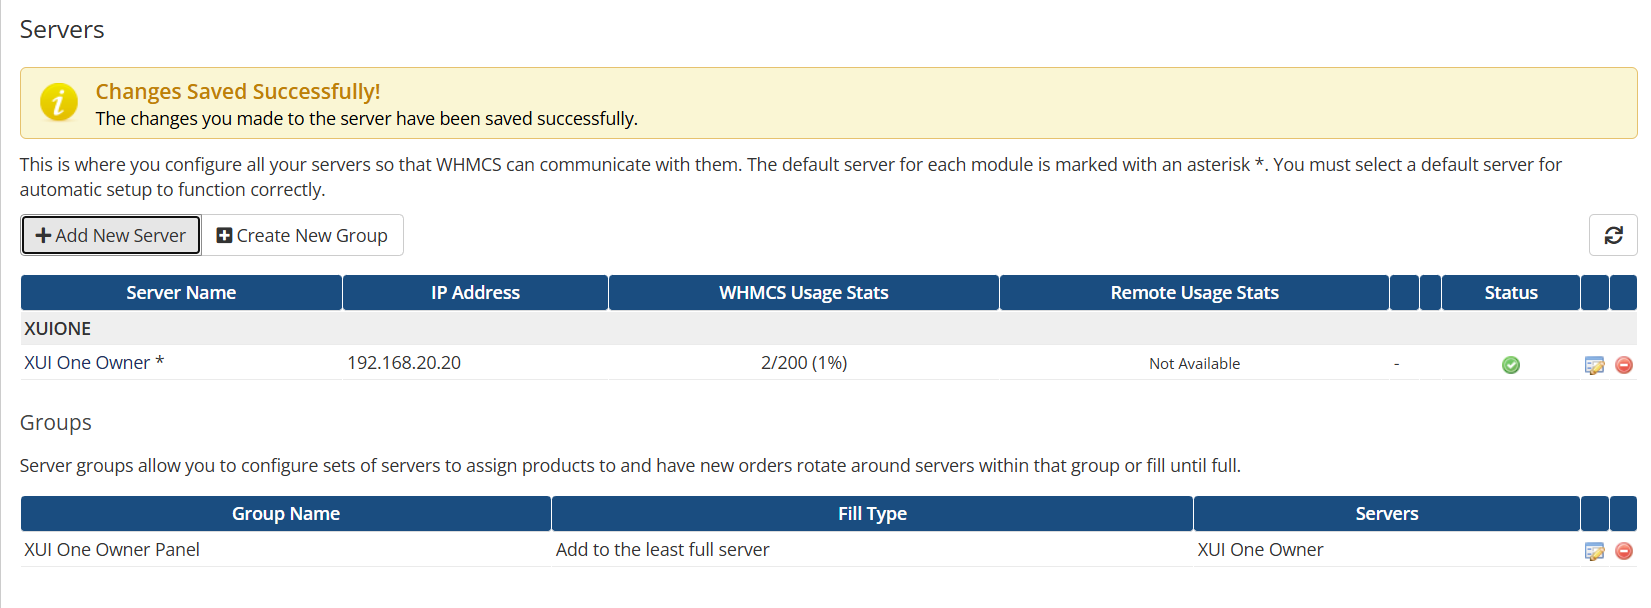
5) Configure the Smarters Billing Module in WHMCS
- WHMCS Admin → Setup → Servers → Add New Server

- Fill in:
- Name: any label (e.g., XUI One Owner)
- Hostname/IP:
192.168.20.20 - Assigned IPs: streaming base URL (e.g., http://192.168.20.20:8080 or your domain)
- Module: XUIONE
- Username:
xuiclient - Password: password set for
xuiclient - Access Hash:
xui - SSL Mode: check if your panel uses HTTPS
- Save → Test Connection → if “Connection successful”, it’s ready.
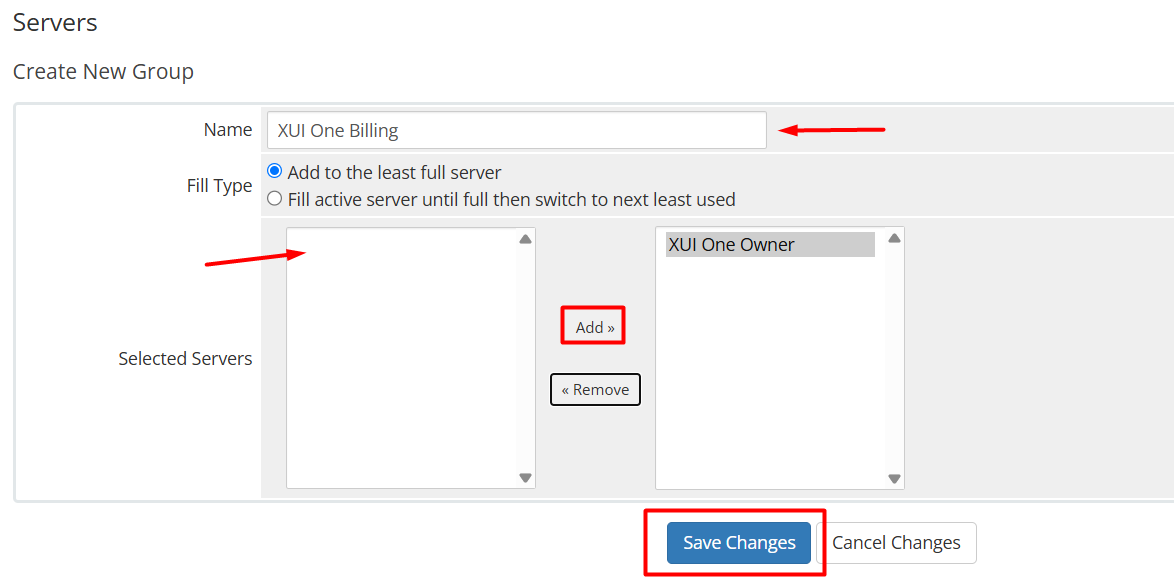
6) (Optional) Create a Server Group

- WHMCS Admin → Setup → Servers → Create New Group
- Name: “XUI One Billing”
- Fill Type: round-robin or fill active server
- Add your server to the group
7) Create Product & Test Auto-Provisioning
- WHMCS Admin → Setup → Products/Services → Create New Group → Create New Product
- Product Type: Other
- Group: the one you created
- Module Settings → Module: XUIONE → Server Group: selected
- Assign Bouquets → choose packages
- Save and place a real test order
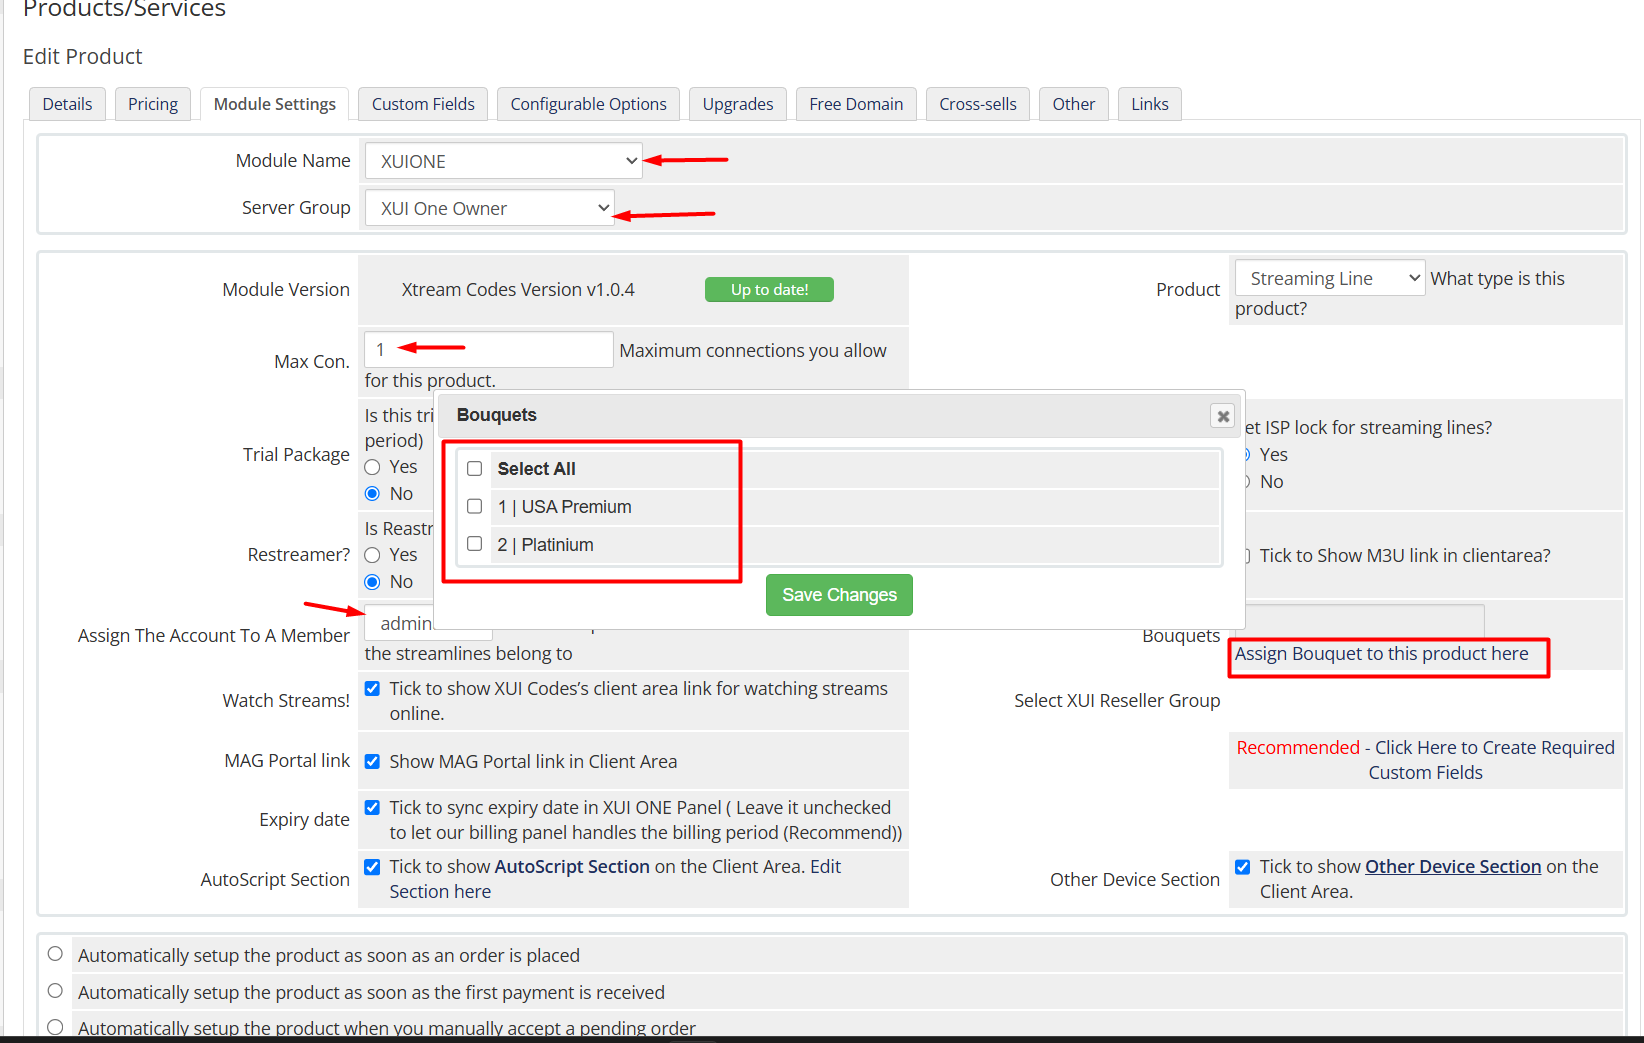
If the line is created and renewal works, integration is complete.

🔒 Security & Privacy Considerations
Many vendors offer “one-click install,” but that usually requires full access to:
- Your XUI.one admin and server SSH credentials and database
- Your WHMCS admin + database + Hosting (VPS, cPanel. etc)
- Your hosting/shell access and all information
Our release focuses on local license validation and clear documentation so you can deploy the module yourself, safely.
If everything provisions correctly, you’re done — you now have a fully automated XUI.one billing flow inside WHMCS. Simple, fast, and comfortable — with full installation and configuration instructions that most vendors never share.
🩺 Troubleshooting Tips
- Provisioning fails → check API URL/port, firewall, module logs, and credentials
- Invoices don’t generate → confirm cron status (Automation Status) and next‑due dates
- Emails don’t send → set SMTP correctly; verify SPF/DKIM/DMARC
- Wrong package on creation → re‑map bouquet/package in Module Settings and re‑provision
🏆 Why This Module + WHMCS Is a Winning Stack
- One portal for clients, orders, invoices, services
- Zero‑touch renewals with suspension/termination logic
- Clean customer experience: client area, ticketing, knowledge base
- Scales to multiple XUI servers and regions
❓ FAQ
Does it work with multiple XUI.one servers? Yes — add each server and assign products accordingly.
Can I run trials safely? Yes — limit to one per client and short duration; require payment method if desired.
What payment gateways are supported? Any gateway you enable in WHMCS (Stripe, PayPal, Crypto, etc.).
Can I customize welcome emails? Absolutely — use merge fields to insert user, password, DNS, and portal links.